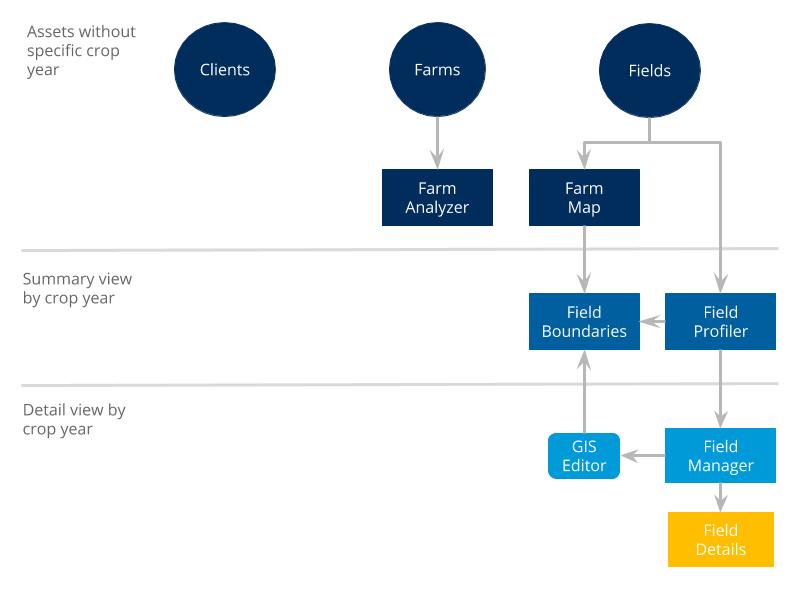
Keep track of fields across your Trimble Ag Software account, with or without a fixed crop year. Fields can be added, merged or retired as your business needs change. Manage field details, draw and import boundaries, transfer fields between crop years and more.
View and manage farm assets online to see what’s growing where and who you’re selling to, with summary and detail views.
Farm Assets | Trimble Ag Software
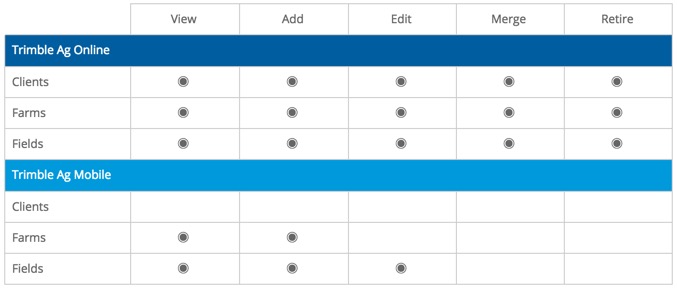
Once farm assets are set up online in your Trimble Ag Software account, including clients, farms and fields, you can view and make certain changes to these records on the mobile app.
Farm Assets Options | Trimble Ag Online and Trimble Ag Mobile
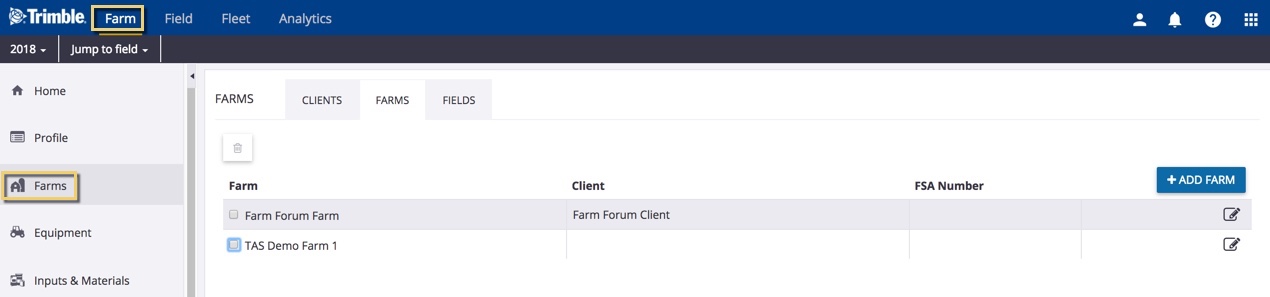
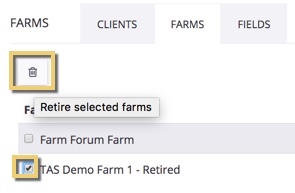
When you’re starting to set up your Trimble Ag Software account, you can easily retire clients, farms or fields from your online account, with the option to unretire partial details for these items later. Do this in the early stages of setting up your account as, once items are retired, some important information such as operational data and expenses may not be available if the asset is unretired later.
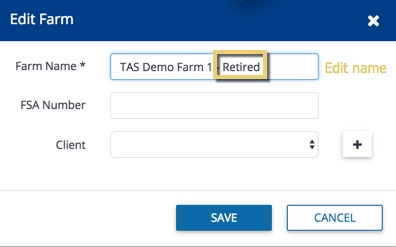
(Optional) Click the pencil icon to edit the name of the asset to identify it later as the retired item when viewing on the mobile app; click Save
Click the checkboxes to select one or more items on the list
Click the delete (retire) icon
Review the warning and click Retire (or Cancel)
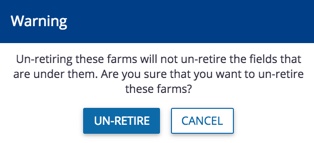
To view retired (deleted) items, check the option on the top right corner to Show Retired, then select one or more items with an asterisk* and click Unretire
Review the warning and click Un-retire (or Cancel)
Note: Fields deleted with the Manage button on Field Manager Overview may still be visible in the list of fields under the Farm menu, where they can be retired from view.
With the mobile app’s automatic map coordinates, plus many of the same features that are available online, you can easily add fields and associated farms on your Trimble Ag Software account using your phone or tablet, with or without cellular or wi-fi coverage. To associate a client name with a farm created on the mobile app, update the Field Profile details online when you’re back in the office.
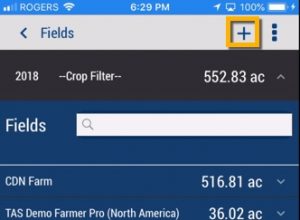
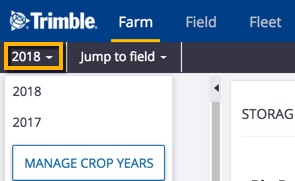
From the mobile app’s home screen, select the preferred crop year (top left)
Tap the Fields tile
Tap the plusicon on the top right corner of the screen to add a new field
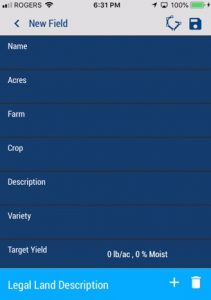
On the New Field editor screen, tap to enter or select details outlined below:
Name – (required) tap to enter the new field name
Acres – (required) tap to enter a number (may be shown as hectares, depending on your settings)
Note: this number will auto-update once a boundary shape is added to the field details (learn more)
Farm – tap to select from the list of farms on your account, or tap Create Farm toadd a new farm to the list (or tap Dismiss)
Crop – (required) tap to search or select from All, My Materials or Purchased crops available (or tap the back arrow to return to the previous screen)
Description – if shown, tap Select a Crop Description (also known as Subcrop) to view options for the selected crop (if blank, the system has no corresponding description; continue to the next item)
Variety – if shown, tap Select a Crop Variety to view options for the selected crop description (if blank, the system has no corresponding variety; continue to the next item)
Target Yield – tap the default 0 lb/ac, 0 % Moist measurements shown to display the Target Yield editor screen, then enter a number and tap a unit of measure to scroll and select options for both yield and moisture rate, then tap Save (or Dismiss)
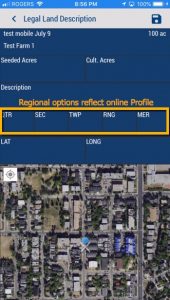
Tap the plusicon next to Legal Land Description (also known as reference points used by land surveys and land title records);
On the Legal Land Description editor screen, tap to enter or select details outlined below (note: regional options are displayed based on the Province or State and Country selected in youraccount Profile online):
Seeded Acres (also known as Tillable Area) – tap to enter the number (may be shown as hectares, depending on your settings) to show the seeded/tillable area as different from the boundary area (for example, when a field has less planting space due to ongoing issues such as flooding, etc.)
Cultivated Acres – tap to enter the number (may be shown as hectares, depending on your settings) if different from Seeded/Tillable Area or Boundary Area
Description – tap add any notes such as text that defines the legal boundaries of your property
Land system references – tap to enter any legal land coordinates (note: regional options are displayed based on the Province or State and Country selected in your account Profile online)
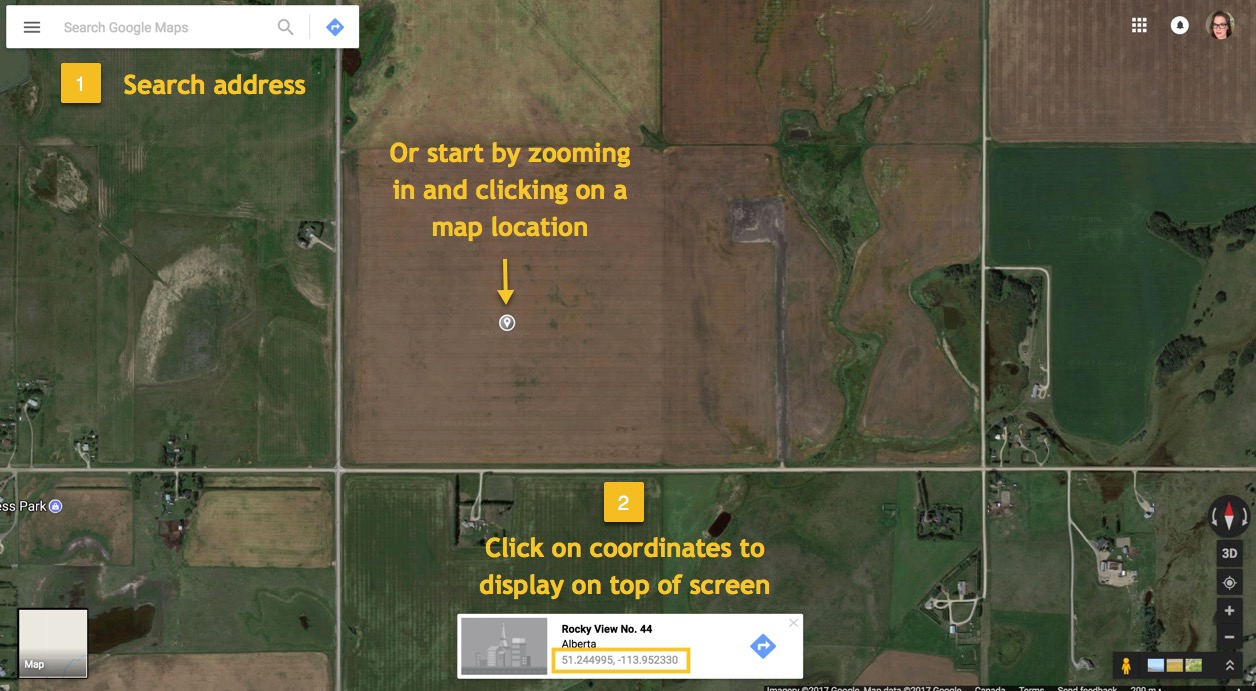
LAT and LONG – automatically update the latitude and longitude coordinates by moving the map under the white X, or tap the white compass icon on the top left corner of the map to move to show your current location
Note: latitude and longitude coordinates are tracked for record-keeping purposes only; boundaries are required if you want to use your mobile device’s built-in GPS to navigate to a field location, or zoom into fields on the maps
Tap the disc icon (top right) to save changes
If Seeded Acres were entered, you may also be prompted with options to update the area for the field:
Select Yes to overwrite the field acres to match the Seeded Acres, which also updates the Field Manager Overview online
Select No to keep the Seeded Acres as a separate measurement, visible only when viewing records under the Legal Land Description on the mobile app
Sync changes with the online account when you’re within cellular or wi-fi range, by returning to the home screen and tapping the green sync icon (top right)
With the mobile app’s automatic map coordinates, plus the same features that are available online, you can easily edit fields on your Trimble Ag Software account using your phone or tablet, with or without cellular or wi-fi coverage.
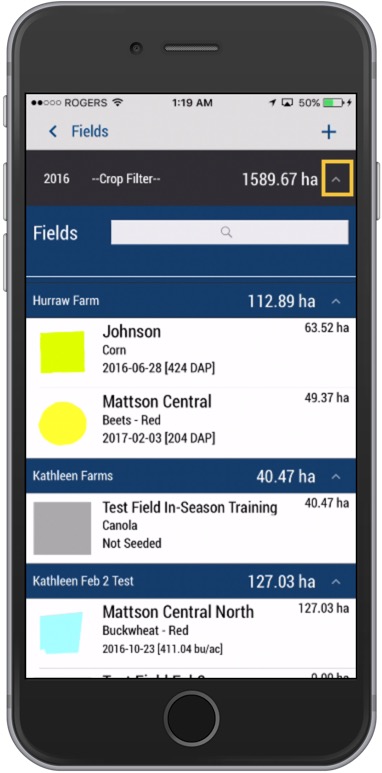
From the mobile app’s home screen, select the preferred crop year (top left)
Tap on the Fields tile
Tap the arrow on the black row to expand the farms list, then scroll and tap to select a field
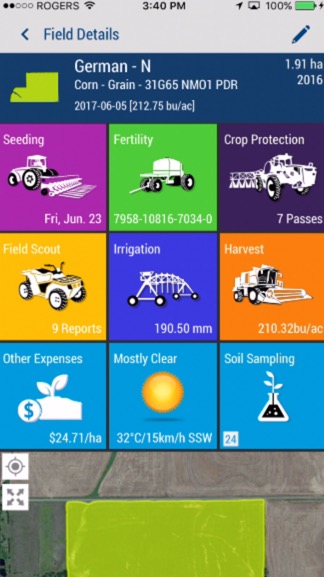
Tap the pencil icon (top right) to edit Field Details
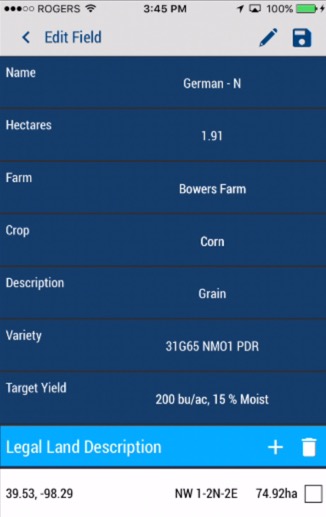
Tap to change information on the Edit Field screen
Tap Name to edit the field name
Tap Hectares to edit a number (may be shown as acres, depending on your settings)
Tap Farm to select from the list of farms on your account, or add a new farm to the list
Tap Crop to search or select from Purchased, Frequent or All crops available
Tap Description to search or select options available for the selected crop
Tap Variety to search or select options available for the selected crop
Tap Target Yield to edit the quantity per area, tapping on the unit of measure shown to scroll and select a different measurement from the list, edit the moisture percentage, then click Save (or Dismiss)
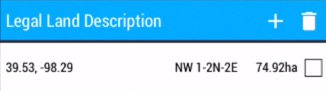
Tap to edit the Legal Land Description (a series of numbers listed on land title records, representing section, township, range and meridian), or tap the checkbox to select and delete the entry, then tap the + icon to add a new entry
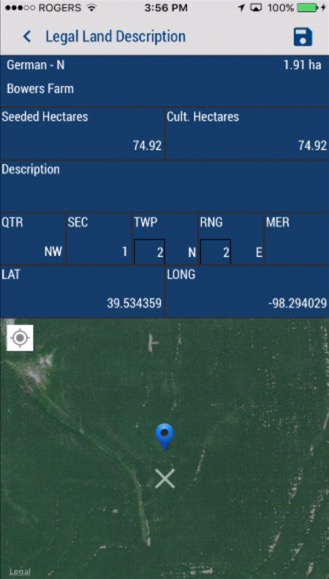
Tap Seeded Hectares to edit the number (may be shown as acres, depending on your settings)
Tap Cultivated Hectares to edit the number (may be shown as acres, depending on your settings)
Tap Description to edit or add any notes
Tap QTR to select from the list of Quarters (or click Dismiss)
Tap SEC to select from the list of Section numbers (or click Dismiss)
Tap TWP to add or edit the Township
Tap RNG to add or edit the Range
Tap MER to select from the list of Meridians (or click Dismiss)
Automatically update the LAT and LONG (latitude and longitude) coordinates by moving the map under the white X, or tap the white compass icon on the top left corner of the map to move to show your current location
Tap the disc icon (top right) to save changes
Sync changes with the online account when you’re within cellular or wi-fi range, by returning to the home screen and tapping the green sync icon (top right)
When you’re on the go, use the mobile app’s simple point-and-click tools to drive or draw boundaries and automatically update boundary area in your Trimble Ag Software account. View or zoom into your location on satellite maps while your phone’s GPS automatically updates latitude and longitude coordinates for your field. By adding boundaries to your fields, you’ll be able to access more map information for weather, Crop Health Imagery, as-applied coverage maps and vehicle locations across your farm.
From the mobile app’s home screen, select the preferred crop year (top left)
Tap the Fields tile
Tap the arrow on the black row to expand the farms list, then scroll and tap to select a field
Tap the pencil icon (top right) to edit Field Details
Tap the boundary icon (top right) on the Edit Field screen
Tap DRAW
Tap Start
Slide the map under the white X to pinpoint a location
Tap + Add Point to drop the first boundary point
Continue sliding the map under the X and adding points (or tap the undo arrow to undo)
Close the shape by adding the last point on top of the first point
Continue editing the boundary to Add or Subtract area (land formations, buildings, etc.), if needed, then click Done
Tap the disc icon (top right) to save changes (or click the trash icon to delete)
Tap Yes (or No) at the prompt to Update Area
View the updated area on the Edit Field screen (may be shown as acres or hectares, depending on your settings)
Tap the disc icon (top right) to save changes
Sync changes with the online account when you’re within cellular or wi-fi range, by returning to the home screen and tapping the green sync icon (top right)
With the same tools used to draw boundaries on the mobile app, you can also drive boundaries in your vehicle while using your phone or tablet to to automatically update boundary area in your Trimble Ag Software account. View or zoom into your location on satellite maps while your phone’s GPS automatically updates latitude and longitude coordinates for your field. By adding boundaries to your fields, you’ll be able to access more map information for weather, Crop Health Imagery, as-applied coverage maps and vehicle locations across your farm.
From the mobile app’s home screen, select the preferred crop year (top left)
Tap the Fields tile
Tap the arrow on the black row to expand the farms list, then swipe up and tap to select a field
Tap the pencil icon (top right) to edit Field Details
Tap the boundary icon (top right) on the Edit Field screen
Tap DRIVE
Tap Offset to record your mobile device’s in-vehicle’s distance and direction from the edge of your field boundary
Enter a number for Distance (shown in feet or meters, depending your settings)
Tap the checkmark icon to save the offset
Tap Start
Drive the perimeter of your field, tapping Pause as needed
When ready, tap Resume
When finished driving, tap Done
Continue editing the boundary to Add or Subtract area (land formations, buildings, etc.), if needed, then tap Done
Tap the disc icon (top right) to save changes (or delete trash can)
Tap Yes (or No) at the prompt to Update Area
View the updated area on the Edit Field screen (may be shown as acres or hectares, depending on your settings)
Tap the disc icon (top right) to save changes
Sync changes with the online account when you’re within cellular or wi-fi range, by returning to the home screen and tapping the green sync icon (top right)
Add fields to your online account with as much or as little information as you need, with the option to draw or import boundaries to auto-calculate area for boundaries. Start by selecting the preferred crop year, then enter details on each tab before saving all changes at once. Return to this field profile editor any time by jumping to a field or selecting the field name from the Field Profiler list, then click Manage and select Update.
Use the Crop tab to define the crop details, practices and plan for your field
Use the Legal tab to record the legal land description and latitude/longitude coordinates (visible to North American customers only based on the Country selected in your account Profile online)
Use the Soil tab to select options to define the soil profile
Use the Processor tab to track and share food processor service details (contact support for help with adding this option to your account)
Use the Irrigation tab to select options to define your water management strategy
Click Save to capture all changes and launch the Field Manager to start tracking field tasks and expenses
From the Field Profiler screen that displays a list of fields in your account, click the Manage button (top right)
Select Add New Field
The field profile editor is displayed as shown below (note: the left navigation menu disappears when using this screen)
From the General tab (shown above), enter or select the options below:
Enter the Field Name (required)
Select a Client from the dropdown list (or click + to add a client name to the list)
Select a Farm name from the dropdown list (or click + to add a client name to the list)
Note: client and farm names are associated with each other in Trimble Ag Software to line up with most vehicle displays; if you’re not seeing a farm name in the dropdown list, check that the related client has been added to that farm under Farms on the Farm tab (learn more)
Update the Boundary Area (default is 0.00, shown as acres or hectares, depending on your settings) to define the field land perimeter in one of two ways:
Draw a boundary shape on the map (learn more), then click refreshto automatically update both the Boundary Area and Tillable Area with the same number
Add a boundary shape file by clicking Import .Shp File, then click refreshtoto automatically update both the Boundary Area and Tillable Area with the same number
Note: always add a boundary shape to your field so that you can access more Trimble Ag Software map information for weather, Crop Health Imagery, as-applied coverage maps and vehicle locations across your farm
If needed, adjust the Tillable Area (also known as Seeded Area) that will also be displayed at the top of the Field Manager Overview screen, to show the tillable area as different from the boundary area (for example, when a field has less planting space due to ongoing issues such as flooding, etc.), by changing this number in one of two ways:
Manually enter the preferred number (default is 0.00 until a boundary shape has been drawn or imported on the map, in which case the Tillable Area will auto-update to match the Boundary Area)
Go to the Legal tab (visible to North American customers only) and enter the Seeded Area for one or more parcels of land, which will auto-update both the Seeded Area on the Legal tab and the Tillable Area on the General tab
Note: the Legal tab also includes an option to record the Cultivated Area, which is not associated with the Boundary Area or Tillable/Seeded Area
Continue to the next tab, or click Save to launch the Field Manager(return to this field profile editor by clicking the Manage button, then select Update)
From the Crop tab, enter or select the options below:
Select a Subcrop (if applicable) from the list that automatically matches your selected crop (for example, popcorn is a subcrop of a corn crop)
Select a Variety (if applicable) from the list that automatically matches your selected Subcrop
Enter an estimated Yield Goal for each acre (or hectare, depending on your settings), which will be used in crop plans and reports that show projected revenue
Enter an estimated Target Moisture level as a percentage
Select your preferred method of farming from the Cultural Practice list
Select the type of Ownership for this field from the list
Select a Lease Date (if applicable) from the calendar by clicking inside the blank field
Note: a date cannot be added later if the field profile details are saved without a Lease Date
Add Crop Rotation Historyfor the two years prior to current year, by selecting the crop and and subcrop for each year, which will be shown in your crop planning reports
Continue to the next tab, or click Save to launch the Field Manager(return to this field profile editor by clicking the Manage button, then select Update)
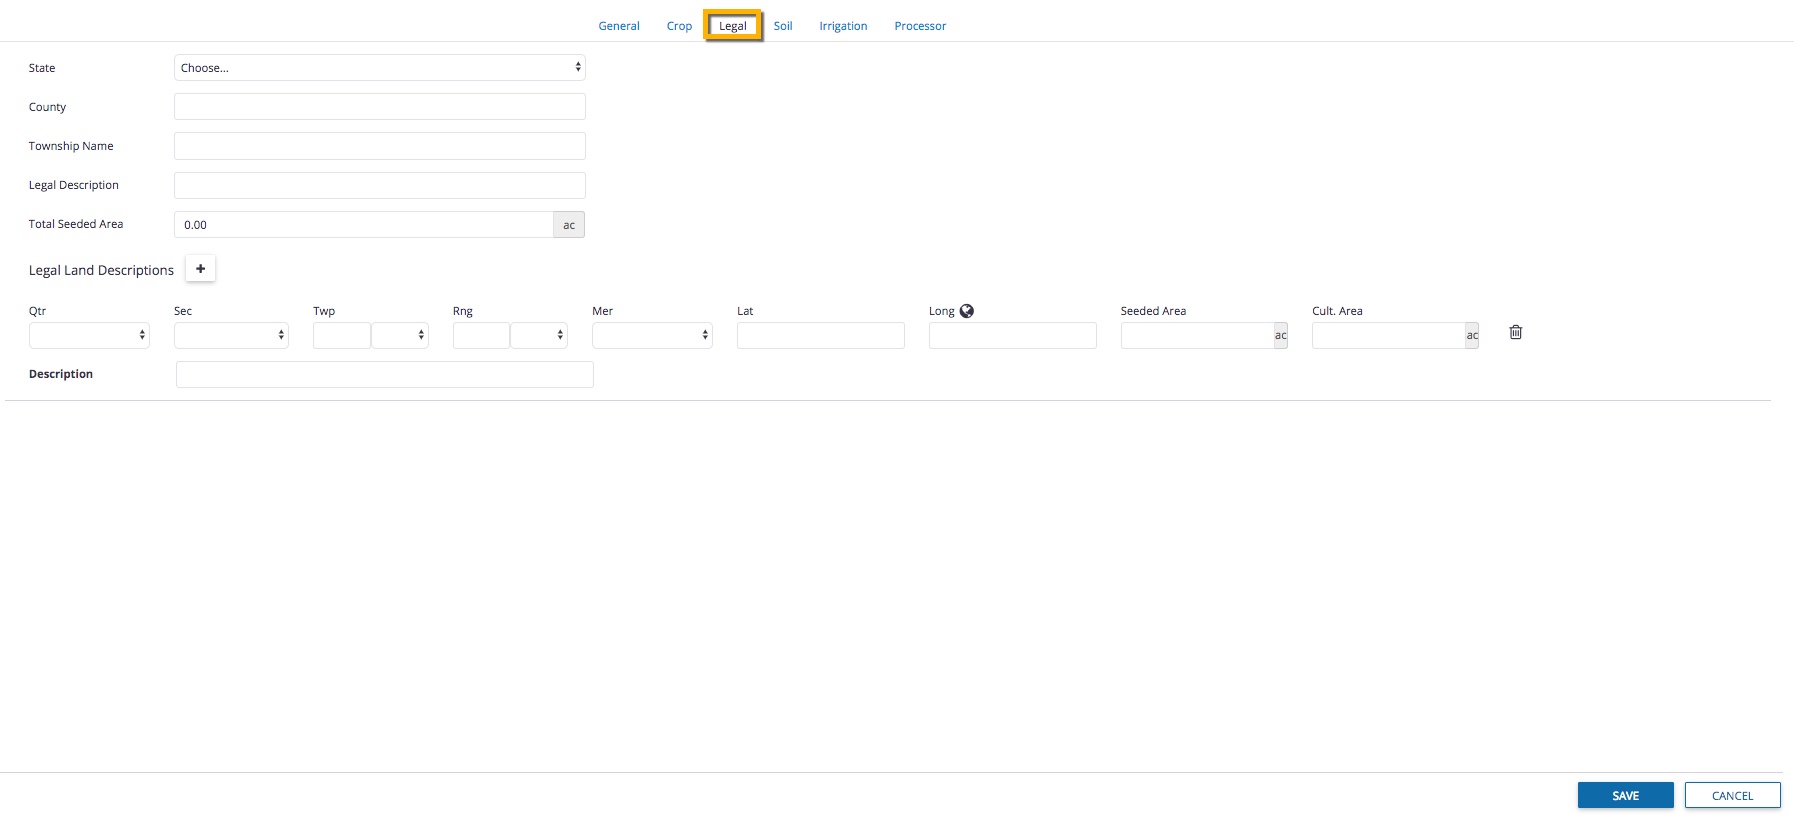
From the Legal tab (visible to North American customers only based on the Country selected in your account Profile online), enter or select the options below:
Select the State (or Province) from the list (options are displayed based on the Country selected in your account Profile online)
Enter the County name (if applicable)
Enter the Township name (if applicable)
Enter the Legal Description (text that defines the legal boundaries of your property)
If needed, adjust the Total Seeded Area number which will automatically show the combined total of Seeded Area entered for each land parcel (displays acres or hectares, depending on your settings)
Note: default is 0.00 if Tillable Area on General tab has not been entered or a boundary shape has not been added on the General tab, or until the Seeded Area for one or more parcels of land is entered, as outlined below
Enter the Legal Land Description (also known as reference points used by land surveys and land title records; regional options are displayed based on the Province or State and Country selected in your account Profile online) by clicking the plus + icon to add or trash icon to delete additional locations for each parcel of land, as follows:
Qtr – select a quarter compass direction from the list
Sec – select a section number from the list
Twp – select a township number from the list
Rng – select a range number from the list
Mer – select a meridian number from the list
Lat/Long – enter the latitude and longitude coordinates or click the globeicon to automatically generate coordinates from the legal land description entered
Seeded Area – also known as Tillable Area on the General tab, enter the total area for each parcel of land
Note: the Seeded/Tillable Area may be different from the Boundary Area on the General tab in cases where the field has less planting space due to ongoing issues such as flooding, etc.)
Cult. Area – enter the total cultivated area
Add a Description with notes for this legal profile
Continue to the next tab, or click Save to launch the Field Manager(return to this field profile editor by clicking the Manage button, then select Update)
From the Soil tab, enter or select the options below:
Soil Type – select your field’s type from the dropdown list
Sand – enter the percentage of sand found in your soil
Silt – enter the percentage of silt found in your soil
Clay – enter the percentage of clay found in your soil
ENR (coef.)(Lbs N per % of OM) – enter the soil’s estimated nitrogen release
Plant Available Water – enter the soil’s volume of water available to plants
Est. Nitrogen Efficiency – enter the soil’s level of nitrogen efficiency
Continue to the next tab, or click Save to launch the Field Manager(return to this field profile editor by clicking the Manage button, then select Update)
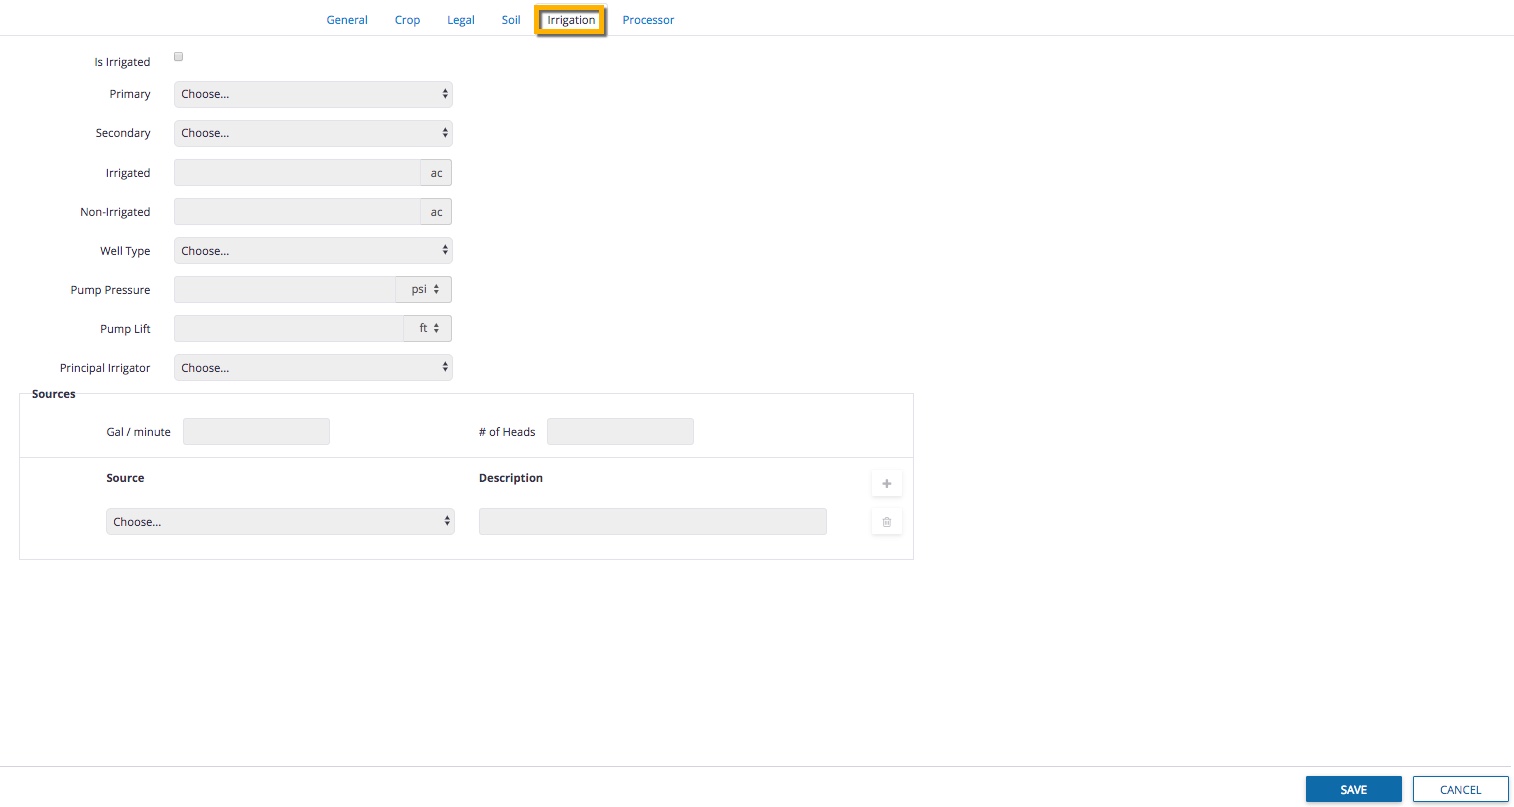
From the Irrigation tab, enter or select the options below:
Is irrigated – click the checkbox to show if this field is irrigated (default when not checked shows greyed-out, disabled options below)
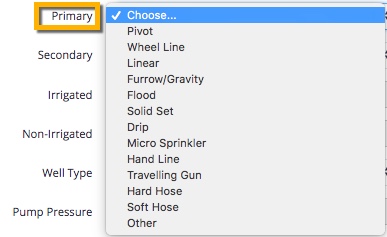
Primary – select the primary application method from the list
Secondary – select the secondary application method from the list (same options as listed in Primary above)
Irrigated – enter the size of the irrigated area
Non-Irrigated – enter the size of the non-irrigated area
Well Type – select Single or Shared from the list
Pump Pressure – enter the pressure value and click the measurement to select psi (pounds per square inch) or kPa (kilopascal)
Pump Lift – enter the vertical distance from intake into the pump and click the measurement to select ft (feet) or m (meters)
Principal Irrigator – select Self or Landlord from the list
Define Sources (click +to add or delete additional sources):
Gal / minute – enter the number of source gallons per minute
# of Heads – enter the number of irrigation heads
Source – select the irrigation source from the list
Description – enter a description with notes on the source
Continue to the next tab, or click Save to launch the Field Manager(return to the field profile editor by clicking the Manage button, then select Update)
From the Processor tab (visible on request through customer support), enter or select the options below:
Contract Number – enter the contract number from your food processor agreement
Region – select your food processor’s region of operations from the list (visible when set up by customer support)
Processor – select your food processor from the list (visible when set up by customer support)
Processor PIN – enter the personal identification number used to authenticate data sharing from your Trimble Ag Software account to your food processor
Processor Field ID – enter the corresponding ID for this field location from the food processor’s system
Click Save to launch the Field Manager(return to the field profile editor by clicking the Manage button, then select Update)
In addition to setting up basic information for your fields online, it’s easy to import field boundary data. Our software uses spatial selection to look for matches between your data and our software, starting with the field name. If field names are different, Trimble Ag Software looks for similar field boundaries to find a match.
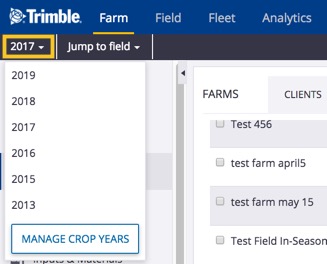
Select the preferred crop year (top left) if a crop will be listed for the field
Click on the Farm tab (top menu)
Select Farms from the left navigation menu
Click on the Fields tab
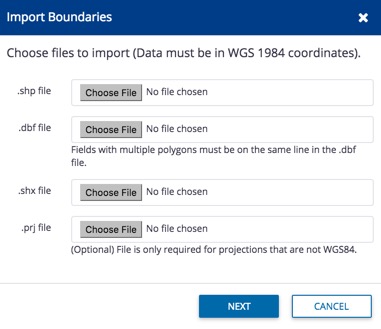
Click the Import Boundaries link (top right)
Click Choose File to upload files from your computer in WGS 1984 GPS coordinates with all three required formats (.shp, .dbf, .shx), as well as the optional format (.prj) for projections that are not WGS84 (WGS 1984, aka WGS84, is a geo-spatial reference system used by the National Geospatial-Intelligence Agency)
Click Next (or Cancel)
Click on the dropdown list next to each item to select matching column names from the .dbf file, including the Field name (required):
Click Save (or Cancel)
Scroll down the list of fields and click the edit icon to view the field map and edit field information
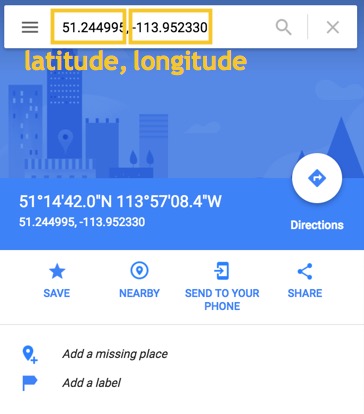
Easily find and save latitude and longitude coordinates in your online field profile details on Trimble Ag Software. These coordinates provide information on your field location only. To automatically zoom into a location on your farm when using the online account, add field boundaries to your map by drawing or importing boundaries.
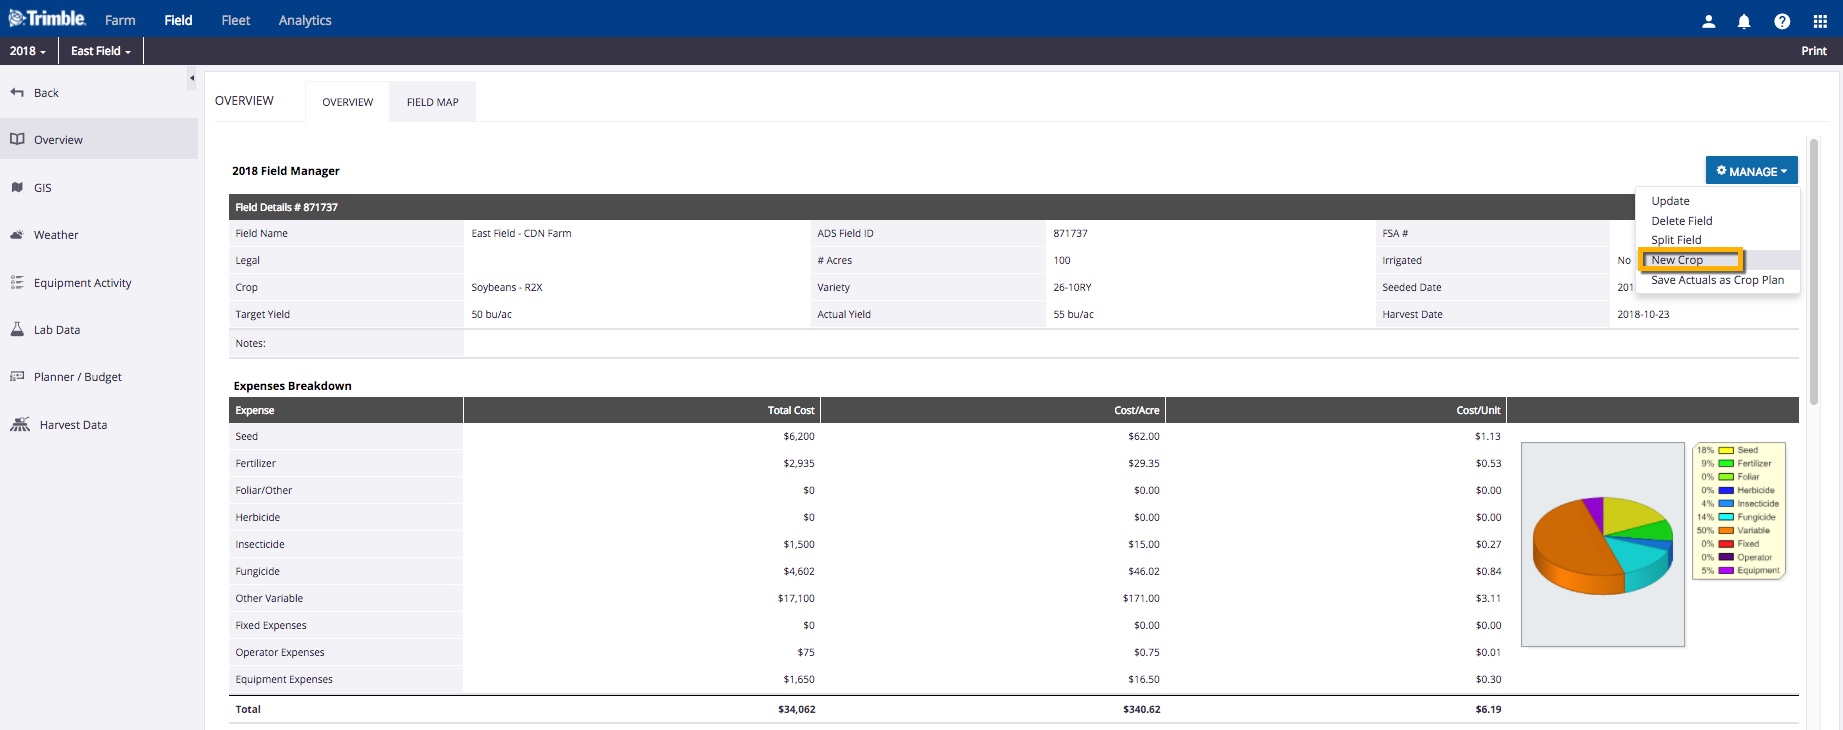
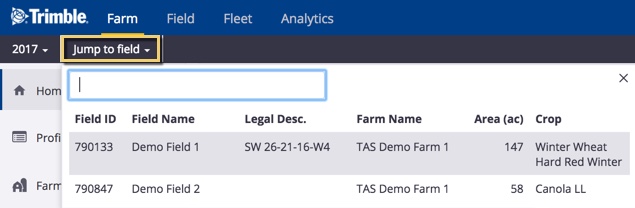
Add a new crop sequence to an existing field to track events and expenses for multiple harvests during the same crop year in Trimble Ag Software. View multiple crop sequences for the same field when the using the quick start menu, Jump to field, in the online account.
if two fields with the same name are shown, choose the field with a crop listed
if you don’t see your field on the list (shows the first 20 fields), go to the Field menu and select Field Profiler, then click on the name of the field to open the Field Manager
From the Field Manager screen, click the Manage button
Select New Crop
Enter a new name and confirm the number of new acres for the next crop sequence
Click the + icon to split the parent field into more than two crop sequence fields (or click the – icon to remove an extra split)
Click Save Fields (or click the X to close the window without making changes)
The Field Profiler screen is displayed
Select the new field (or Jump to Field) to return to the Field Manager screen
Click the Manage button
Select Update
From the field profile details, click the Crop tab to select the new crop sequence from the dropdown list
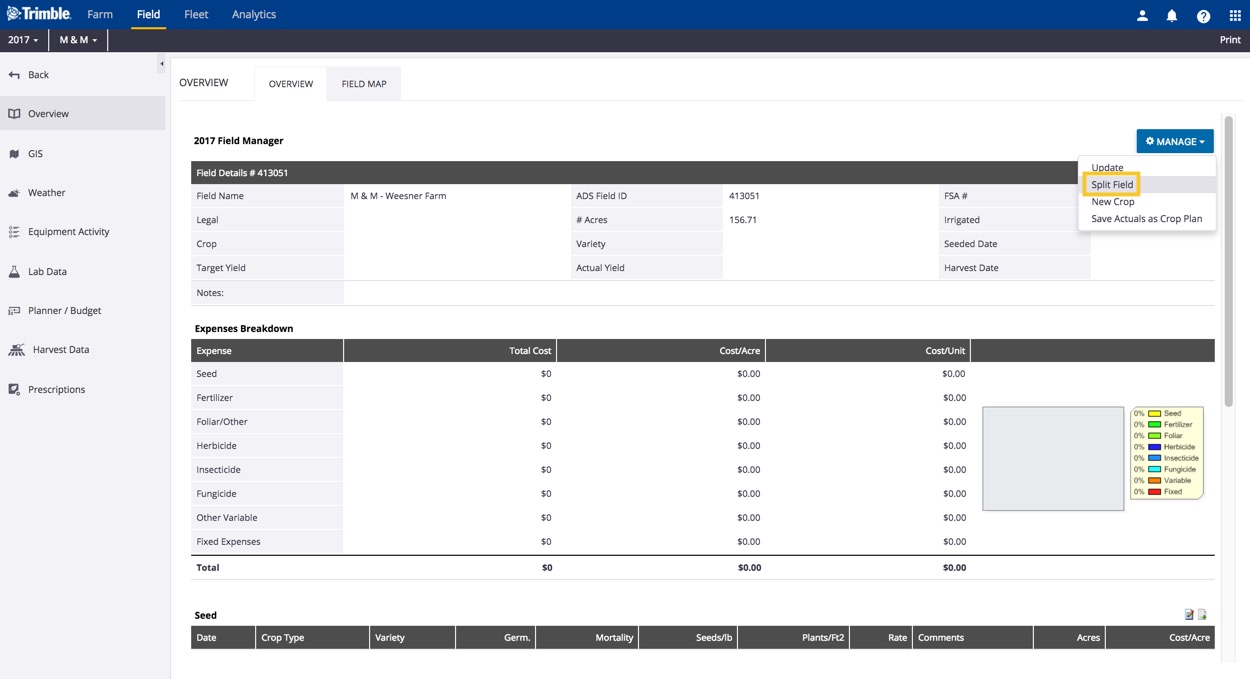
Turn one field into two or more fields with the click of a button in Trimble Ag Software. Use this tool in the early process of setting up your fields online, before adding boundaries, applying products to fields, importing as-applied coverage maps and other tasks that affect field expenses.
if two fields with the same name are shown, choose the field with a crop listed
if you don’t see your field on the list (shows the first 20 fields), go to the Field menu and select Field Profiler, then click on the name of the field to open the Field Manager
From the Field Manager screen, click the Manage button
Select Split Field
Assign new names and number of acres for each field:
Click the + icon to split the parent field into more than two fields (or click the – icon to remove an extra split)
Click Save Fields (or click the X to close the window without making changes)
Edit the field boundaries, if needed, from the Field Profiler screen that launches
Edit the Field Details, if needed (note: the name of the parent field will still be displayed for both when using Jump to Field)
In addition to managing fields and boundary data, use the Field Profiler™ to preview, draw, delete and change boundary colours in Trimble Ag Software. Web drawing tools allow you to zoom in to your farm location on satellite maps to create point-and-click shape files. Easily edit, redraw and add inner boundaries, while the software auto-calculates the size of drawn boundaries for your fields.
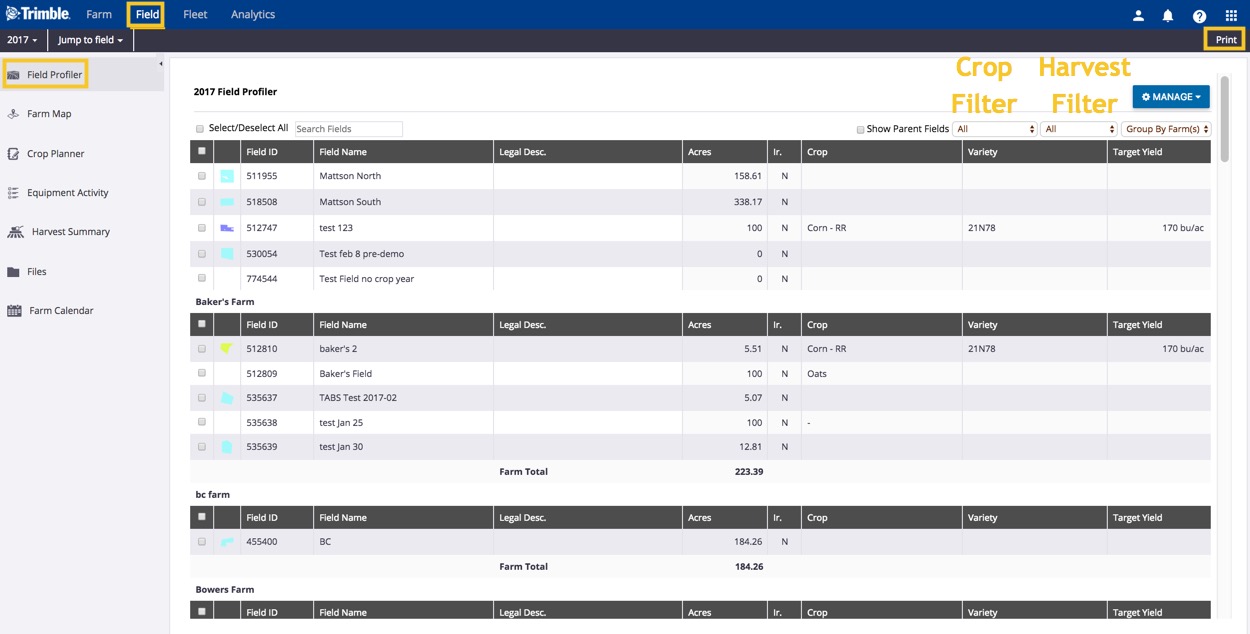
View the list of fields for the specified crop year, with options to search, filter or print the views selected
Hover your cursor over the field boundary thumbnail image (if shown)
Click on the new icons visible for a field (if applicable) to:
Preview Boundary:
View and zoom in/out over a 2D map pop-up of your field boundary
Click the X to close the preview window
Draw Boundary:
Zoom in/out on the map editor pop-up to locate your field
Click Draw Boundary
Click to drop points on the map to create a boundary
Double-click on the last point to finish drawing the boundary
Click Save Boundary
Preview the boundary shape and area size, or use drawing tools at the top of the map to Edit Boundary, Draw Inner Boundary, Redraw Boundary, or use Measurement Tools (line or polygon) to draw landmarks such as fences or ponds and calculate distance and area
Click Close Window
Delete Boundary:
Click OK to confirm at warning to remove boundary (or Cancel)
Boundaries deleted from the Field Profiler will still be visible under the Farm menu, where they can also be retired from view.
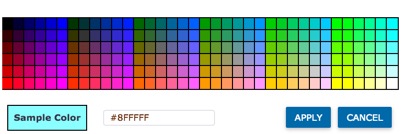
Change Color of boundaries:
Click on a color in the palette grid to view the sample color, or enter an alpha-numeric Hex color code
Click Apply (or Cancel)
Tip: To update boundary colors on multiple fields at once:
Click the check boxes to select one or more fields
Click on the Manage button
Select Update Boundary Color
Use the palette grid (as shown above) to select or enter a color code
Use Field Profiler™ to manage field boundaries by crop year in Trimble Ag Software, with options to add and assign fields, draw and color-code your boundaries, import and export boundary shape files and Google Earth map files, import boundaries from the prior or following crop year, and import or export benchmarks. Our software uses spatial selection to look for matches between your data and our software, starting with the field name. If field names are different, Trimble Ag Software looks for similar field boundaries to match data for both fields.
Select Field Profiler from the left navigation menu
View the list of fields for the specified crop year, with options to search, filter or print the views selected
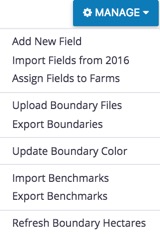
Click Manage to view options
Select Add New Field to add an asset to that crop year (opens the same dialogue found under Farm > Farms > Fields >Add Field)
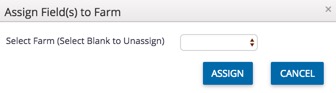
Select Assign Fields to Farms with the click of a button to organize farm assets (learn more)
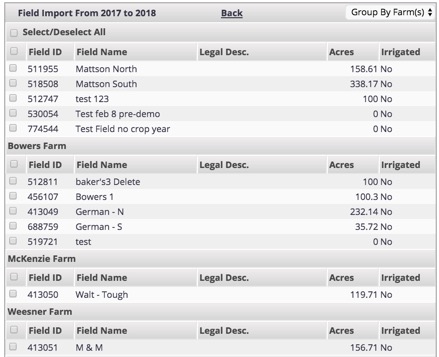
Select Import Fields from 2016 to automatically create a copy of field profiles from another crop year, as a clean slate for the next season’s field tasks and events (learn more)
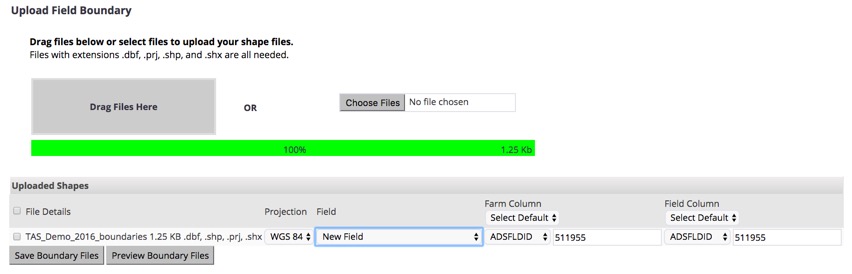
Select Upload Boundary Files to upload shape files (requires all four file types: .dbf, .prj, .shp and .shx):
Verify the results and confirm if the record is a new field, or select a field name from the list:
Select a farm column name and field column name from the list:
Click Preview Boundary Files to view the results
Click Save Boundary Files to complete the upload
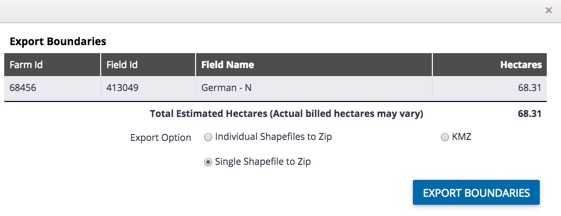
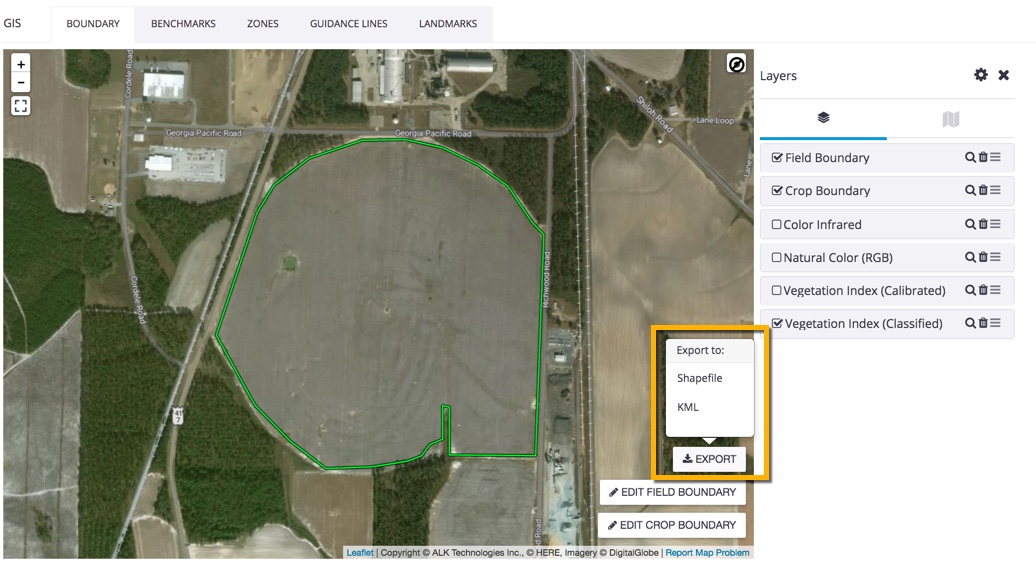
Select Export Boundaries for selected field(s) to download boundary map shape files:
Click to select one of three options:
Individual Shape files to Zip – separate shape files for each field
Single Shape files to Zip – one shape file with all boundaries
KMZ – Google Earth/Google Map files
Click Export Boundaries (or click X to close the window without saving changes) to download files to your computer
Select Update Boundary Color to apply custom colours to one or more selected field boundaries (learn more)
Select Import Benchmarks to upload KML or KMZ (Google Earth) or GPX files with map pin locations used for field scouting or other crop management identifiers:
Click Icon to select a new shape or colour for the pin
Click Update Benchmarks
Select Export Benchmarks for selected field(s) to download KML (Google Earth) files to your computer, with map pin locations used for field scouting or other crop management identifiers
Select Refresh Boundary Acres to update the size of boundaries when ordering PowerZones (contact our sales team to learn more). Note: this option may show hectares, depending on your account settings.
Use a wide range of drawing tools available online in Trimble Ag Software, with the GIS editor. Create point-and-click shape files that auto-calculate the boundary area, including polygons, lines as well as circles for fields managed by centre-pivot irrigation, with the option to save separate crop and field boundaries. Units of measure shown in the boundary area can be adjusted in your account settings.
Tip: when adding or updating a field from the Field Profiler, the boundary drawing options are the same when starting from Step 9 below.
if two fields with the same name are shown, choose the field with a crop listed
if you don’t see your field on the list (shows the first 20 fields), go to the Field tab and select Field Profiler, then click on the name of the field to open the Field Manager
as an alternative, you can go directly to the GIS editor screen by going to the Farm menu and select Farms, then click on the Fields tab and click the edit icon next to a field name
Note: the direct-to-GIS method may not work if you see and select fields that were already deleted from the Manage button on the Field Manager screen but were not yet retired as assets on the Farm menu
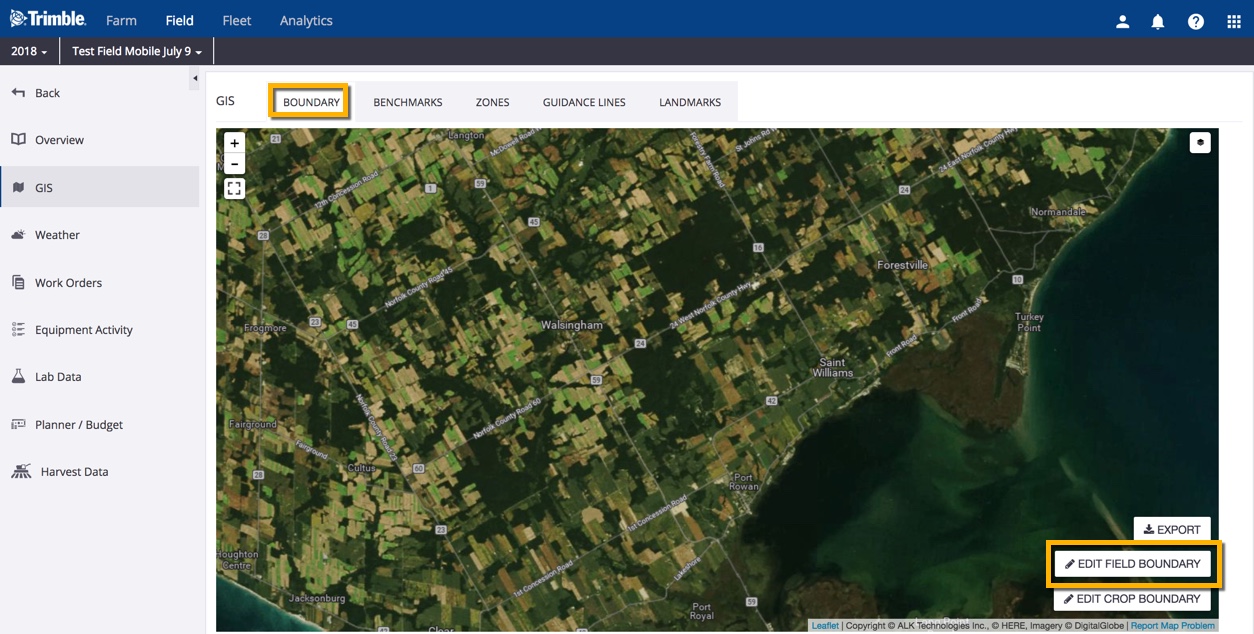
From the Field Manager screen, select GIS from the left navigation menu
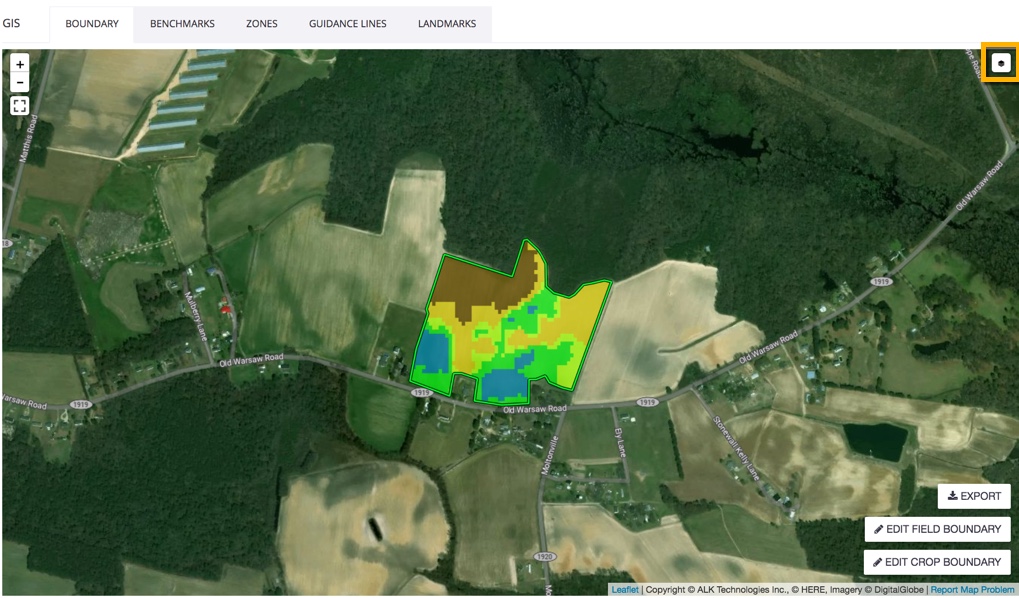
From the Boundary tab, click Edit Field Boundary (bottom right)
Zoom in to the preferred location on the satellite map using the plus + and minus– icons (bottom right), or click and drag to move the map in any direction
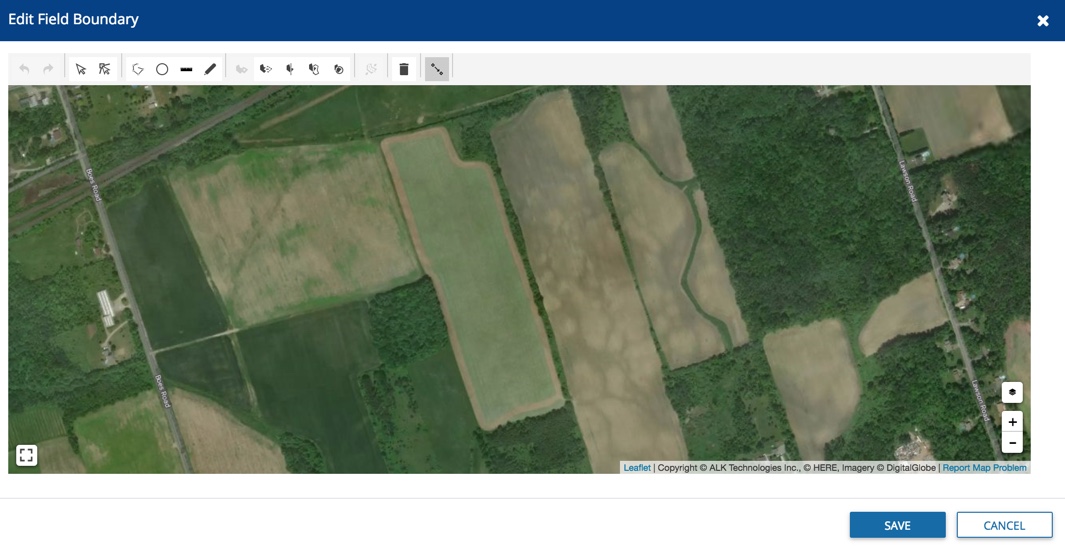
Hover over the drawing tools at the top of the map to see options available, depending on the state of the drawing
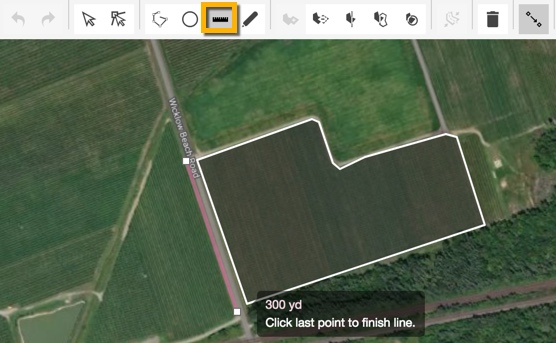
Click on the Draw Polygon icon
Click to drop points on the map along the outer edges of the field boundary as guided by the on-screen prompts, following the shape as closely as possible to minimize editing later
At any time, click Delete last point or Cancel, as needed
Click the first point to close the shape (note: the tool will automatically display overlapping points, which will create errors in the boundary shape file, preventing the invalid shape from being saved)
Click Save (or Cancel)
Click to select the boundary shape and continue editing, if needed
Click the Subtract by Polygon icon to remove non-tillable areas from the boundary
Click to drop points on the map to outline the shape to be removed
Click on the last point to close and remove the shape from your boundary
Continue editing the boundary shape, or click the trash icon to delete the boundary
Click Save (or Cancel)
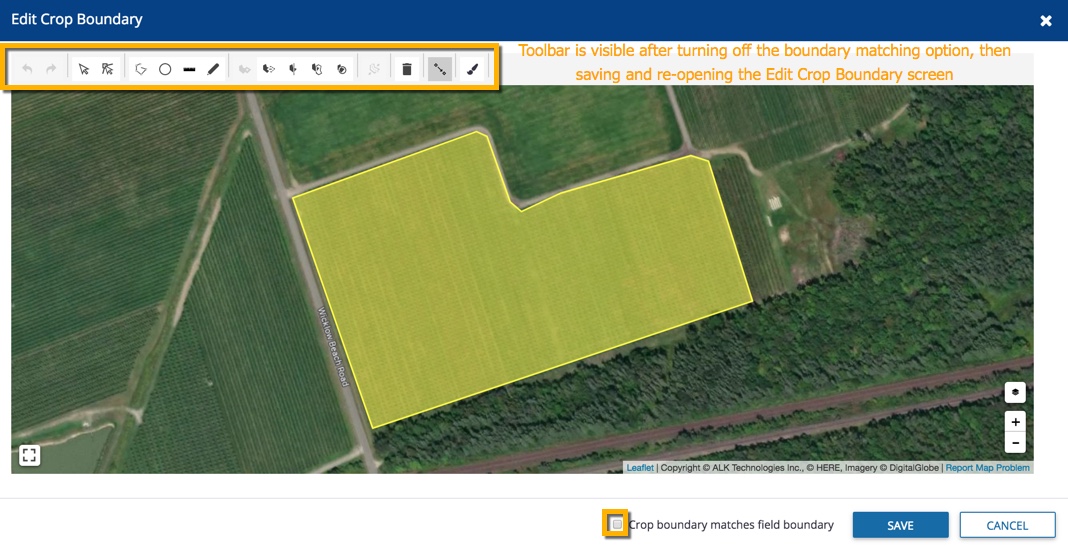
To add a Crop Boundary that is different from the Field Boundary, click Edit Crop Boundary
Click the checkbox next to crop boundary matches fieldboundary to turn this default option off (when not selected, allows for separate tracking of overall field perimeter versus smaller tillable or seeded area that excludes land formations, buildings, etc.)
Click Save (or Cancel)
Click Edit Crop Boundary again to display the boundary map along with map editing toolbar
Change the Crop Boundary color by selecting the Paintbrush icon in the toolbar, then click to select a color from the palette, or enter the Hex color ID, and click OK (or Cancel)
More GIS Boundary Drawing Tools
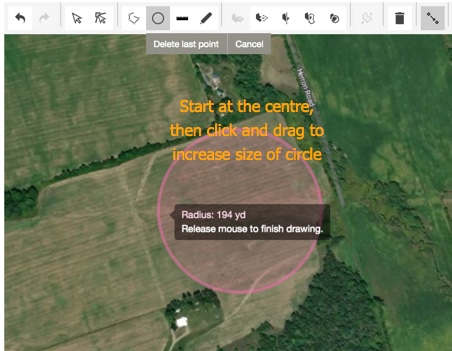
Hover over the icons to explore more drawing options with on-screen tips, including:
Circle boundaries for centre-pivot irrigation – start by clicking on the center of the field, click and drag in any direction to increase the circle radius, then release to close the shape
Measure distance with the line tool, to add map references for items like fences or roads
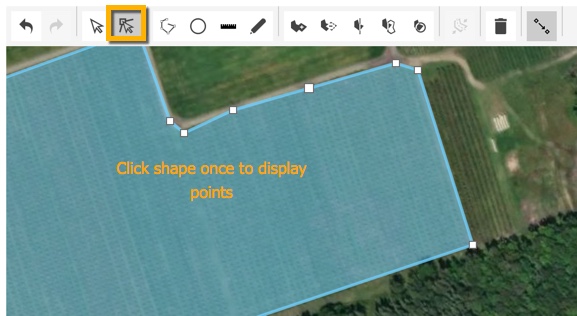
Edit a polygon vertex (point where edges meet) to resolve errors in the boundary shape file caused by overlapping points
Start by clicking once on the shape to display boundary points
To add a new vertex (point), hover along the shape edge in between points, then click to complete the action
To move or delete a vertex (point), click on an existing point to display the options, then drag or click to complete the action
Delete a boundary by clicking the shape so that it is displayed as a solid color
With Trimble Ag Software, you can use online filters to turn map layers on and off, overlaid on boundaries across your farm. Adjust layers to view field and crop boundaries, benchmarks, guidance lines, landmarks, as-applied coverage maps, Crop Health Imagery, as well as management zones and vehicle tasks.
if two fields with the same name are shown, choose the field with a crop listed
if you don’t see your field on the list (shows the first 20 fields), go to the Field menu and select Field Profiler, then click on the name of the field to open the Field Manager
as an alternative, you can go directly to the GIS editor screen by going to the Farm menu and select Farms, then click on the Fields tab and click the edit icon next to a field name
Note: the direct-to-GIS method may not work if you see and select fields that were already deleted using the Field Profiler but were not yet retired as assets on the Farm menu
From the Field Manager screen, select GIS from the left navigation menu
From the Boundary tab, click the layers icon (top right)
On the Layers selection pane now visible to the right of the map, select from the following options:
Manage Layers – click the gear icon to display the Manage Layers pop-up window, then click an arrow to expand/collapse categories, and check one or more categories then click Save (or Cancel)
Benchmarks – GPS locations for points or pins on a map
Crop boundary – tillable area, in some cases, may be smaller than a field boundary
Crop Health Imagery– in-season imagery to identify areas of stronger and weaker productivity, available in four indeces:
Color Infrared
Vegetation is seen in red
Highlights the vegetation variability
More than 80% of vegetation response is in NIR (near infra-red)
Natural Color (RGB)
Identifies the objects in the field
Facilitates the ground truthing of vegetation index values
Scale 0 – 120 (non-vegetation to dense vegetation)
Vegetation Index (Classified)
5 classes of equal area
Relative scale to accentuate whatever crop variability exists in a field
Optimize drones flights
Can be used for prescription
Enables target scouting and tissue sampling
Guidance Lines – paths used by vehicles or implements for position accuracy
Imagery – view GeoTIFF images uploaded from the Field > Files menu
Landmarks – benchmarks, polygons and boundaries that identify non-tillable area
Management Zones – pattern of zones classifying spatial variability within a field
Tasks – as-applied coverage maps from vehicle display data
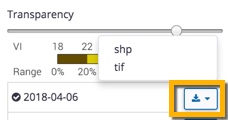
Transparency – click to adjust the slider bar to change map layer from opaque to transparent, when viewing multiple layers at the same time
Layers by date – scroll down to view files by date, then click to view a single layer at a time, with the option to download the selected layer in SHP (Shapefile) or TIF (GeoTIFF) format
Click the Export button (bottom right corner of map) to download a single selected date layer in SHP (Shapefile) or KML (Keyhole Markup) format.
Related: Learn more about editing boundaries here.
In addition to managing fields and boundary data, use the Field Profiler™ to import fields between crop years on your Trimble Ag Software account. Save time by automatically creating a copy of one ore more field profiles as a clean slate for the next season’s field tasks and events.
In addition to managing field boundaries, use the Field Profiler™ to assign fields to farms on your Trimble Ag Software Account. Save time by organizing farm resources with the click of a button.
If you’ve already set up a field in your farm assets without a crop year, it’s easy to add a crop year so that you can view and manage field details in Field Profiler within Trimble Ag Software.
View, edit or print and share high-level plans for your fields, including past crops, current crop and variety, along with target yield rates and prices. Crop plan summaries are automatically generated from crops and fields set up on your account, and are organized by farm and by crop year.
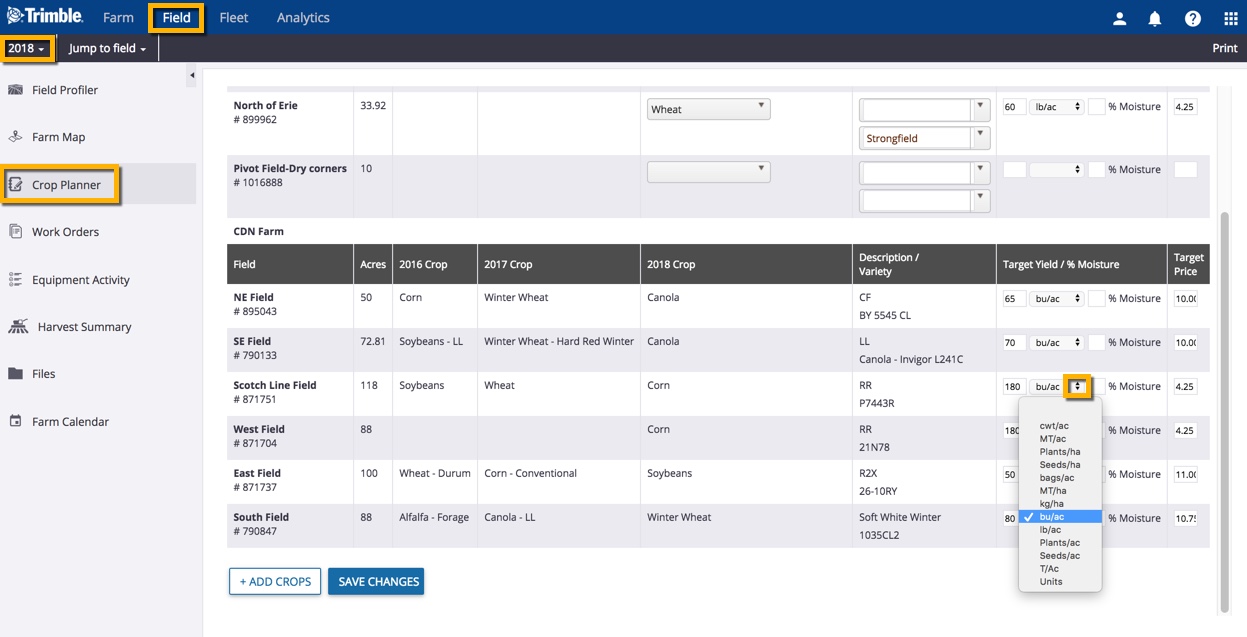
Select Crop Planner (left navigation menu) to display the summary below and edit options for the current crop year:
Select any missing Crops from the list for the current year
Enter or edit the Target Yield amount and select your preferred harvest unit of measure from the list
Enter or edit the Moisture percentage number for target yields
Enter or edit the Target Price for each harvest unit
Scroll down to the bottom of the screen to click Save Changes (or navigate away from screen to cancel changes)
At the prompt, click OK to confirm changes to fields in the current crop year (or Cancel)
More options:
+Add Crops – click to select a new crop from the master list (learn more about adding or editing crops)
View or edit crop planner for a different crop year – select the preferred year (top left corner of screen), then refresh your browser to see updated results
Print – click the link (top right corner of screen) to see a printable view of the crop planner report
Press CTRL+P to select a printer and print hard copies, or print to PDF to save in your files or send as an attachment via email
Using an existing field set up in your Trimble Ag Software account, you can quickly generate a series of field plans to compare the cost of different crop management strategies. Compare side-by-side budgets with basic or complex operational details, to gauge the cost per unit of production and benefits of each scenario. Save time by converting a plan to actuals, to use as your plan of record in the Field Manager when tracking field-level events and expenses throughout the crop season.
Not seeing it? Type the first few letters to search by name, or go to the Field menu to select the field name from the Field Profiler list
if two fields with the same name are shown, choose the field with a crop listed
From the Field Manager screen, select Planner / Budget (left navigation menu)
On the Field Planner screen, add or select options to define a new plan
Enter a Name for your field plan (example: Good, Better and Best)
Select a Code from the dropdown list to help keep your plans organized
Adjust the default Crop, if needed, by selecting a different crop from the list (or click +Add Crops) to add to your crops
Enter a Target Yield amount and click to adjust the unit of measure
Enter a Target Price for the yield
Click Create Plan to save changes (or navigate away from this screen to cancel)
Review the new Field Planner and scroll down to enter relevant fixed and variable expenses for this plan
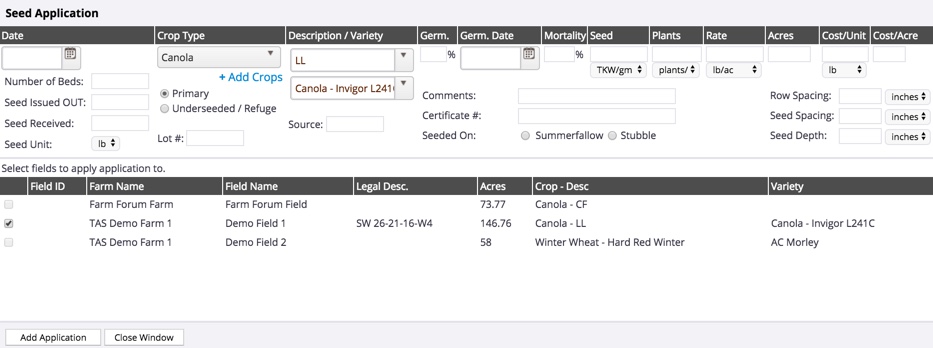
Seed – click the add record icon to display or edit the default crop type costs for any planned seed applications, then select one or more fields and click Add Application (or Close Window)
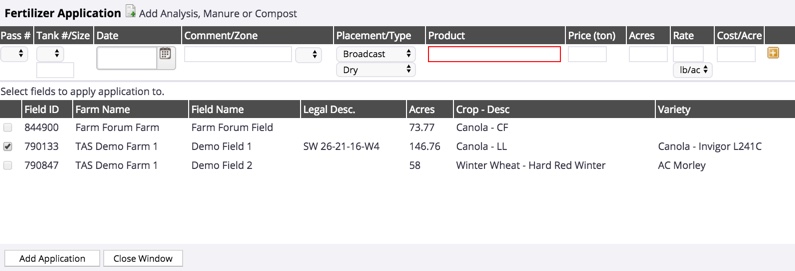
Fertilizer Application – click the add record icon to add any any planned fertilizer applications, then select one or more fields and click Add Application (or Close Window)
To record a fertilizer mix, click the Quick Blender (lighting bolt) icon to make selections from the pop-up window shown below, then click GO
Product Application – click the add record icon to add any any planned applications, then select one or more fields and click Add Application (or Close Window); once a plan is converted to actual, this is where you can view or edit tasks read-in from vehicle displays or third-party accounts in the Field Manager Overview tab
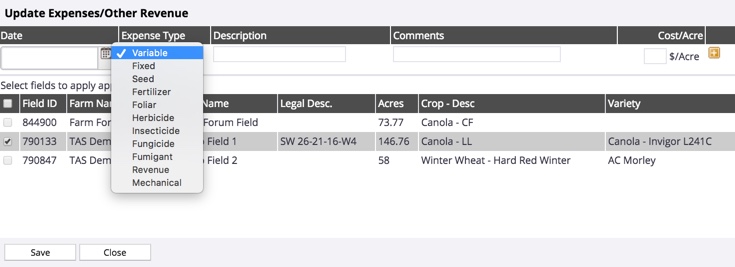
Other Expenses – click the add record icon to add any any other expense types (such as tractor repairs or lease costs), then select one or more fields and click Save (or Close)
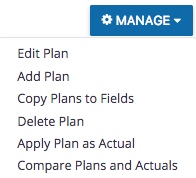
Scroll to the top of the screen and click the Manage Button, then select Compare Plans and Actuals
Select any two plans or actuals from the lists at the top of the screen to view or print the Field Comparison report to see the total cost of operating between actuals (in our example, the Field Manager actuals are on left, and the new scenario, Good – A plan, is on the right)
Click Back (top left) to return to the previous screen
To add more scenarios, click the Manage button and select Add Plan
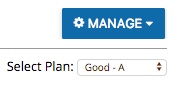
Toggle between plans by choosing from theSelect Plan list, beneath the Manage button
To begin working with your preferred plan as the plan of record, click Manage and select Apply Plan as Actual (replaces existing Field Manager plan of record, including any actual applications or expenses already recorded for the crop year)
From the left navigation menu, select Overview to return to the Field Manager (actuals) screen